1.简介 依赖属性就是一种自己可以没有值,并且可以通过绑定从其他数据源获取值。
将所有的属性都设置为依赖属性并不总是正确的解决方案,具体取决于其应用场景。
MSDN中给出了下面几种应用依赖属性的场景:
希望可在样式中设置属性。
希望属性支持数据绑定。
希望可使用动态资源引用设置属性。
希望从元素树中的父元素自动继承属性值。
希望属性可进行动画处理。
希望属性系统在属性系统、环境或用户执行的操作或者读取并使用样式更改了属性以前的值时报告。
希望使用已建立的、WPF 进程也使用的元数据约定,例如报告更改属性值时是否要求布局系统重新编写元素的可视化对象。
总结自https://www.cnblogs.com/dotnet261010/p/6286475.html
2. 特点 2.1 属性变更通知 无论什么时候,只要依赖属性的值发生改变,wpf就会自动根据属性的元数据触发一系列的动作,这些动作可以重新呈现UI元素,也可以更新当前的布局,刷新数据绑定等等。
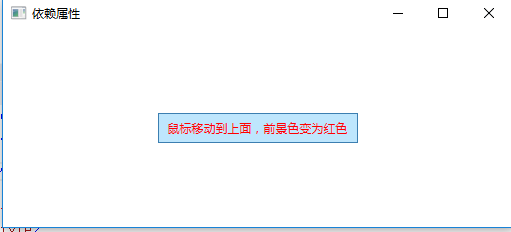
示例:当鼠标移动到Button按钮上面时,文字的前景色变为红色,离开时变为默认颜色黑色,采用传统方式和依赖属性两种方式实现:
2.1.1 使用传统方式实现 在Button按钮上定义MouseEnter和MouseLeave两个事件,分别处理鼠标移动到按钮上面和离开,
XAML界面代码:
1 2 3 4 5 6 7 8 <Window x:Class ="WpfDemo.MainWindow" xmlns ="http://schemas.microsoft.com/winfx/2006/xaml/presentation" xmlns:x ="http://schemas.microsoft.com/winfx/2006/xaml" Title ="Grid面板" Height ="237" Width ="525" WindowStartupLocation ="CenterScreen" > <Grid > <Button Height ="30" Width ="200" MouseEnter ="Button_MouseEnter" MouseLeave ="Button_MouseLeave" > 鼠标移动到上面,前景色变为红色</Button > </Grid > </Window >
C#后台代码实现:
1
2
3
4
5
6
7
8
9
10
11
12
13
14
15
16
17
18
19
20
21
22
23
24
25
26
27
28
29
30
31
32
33
34
35
36
37
38
39
40
41
42
43
44
45
46
47
48
using System ;using System .Collections.Generic;using System .Linq;using System .Text;using System .Threading.Tasks;using System .Windows;using System .Windows.Controls;using System .Windows.Data;using System .Windows.Documents;using System .Windows.Input ;using System .Windows.Media;using System .Windows.Media.Imaging;using System .Windows.Navigation;using System .Windows.Shapes;public partial class MainWindow : Window public MainWindow()name ="sender"></param>name ="e"></param>void Button_MouseEnter(object sender, MouseEventArgs e)as Button;if (btn != null )name ="sender"></param>name ="e"></param>void Button_MouseLeave(object sender, MouseEventArgs e)as Button;if (btn != null )
2.1.2 使用依赖属性实现 XAML界面代码:
1
2
3
4
5
6
7
8
9
10
11
12
13
14
15
16
17
18
< Window x : Class = "WpfDemo.MainWindow" xmlns = "http://schemas.microsoft.com/winfx/2006/xaml/presentation" xmlns : x = "http://schemas.microsoft.com/winfx/2006/xaml" Title = "Grid面板" Height = "237" Width = "525" WindowStartupLocation = "CenterScreen" > < Grid > < Button Height = "30" Width = "200" > 鼠标移动到上面,前景色变为红色< Button . Style > < Style TargetType = "Button" > < Style . Triggers > < Trigger Property = "IsMouseOver" Value = "true" > < Setter Property = "Foreground" Value = "Red" ></ Setter > </ Trigger > </ Style . Triggers > </ Style > </ Button . Style > </ Button > </ Grid > </ Window >
使用上面的两种方式都可以实现Button按钮的前景色改变,效果如下:
在判断属性IsMouseOver的值为false的时候,自动将Foreground的值改为之前的值,因此就不需要写IsMouseOver的值为false的时候,将Foreground的值改为Black。
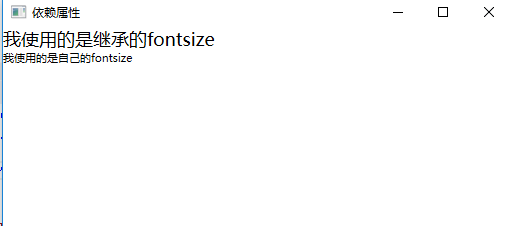
2.2 属性值继承 是指属性值自顶向下沿着元素树进行传递。
1 2 3 4 5 6 7 8 9 10 11 <Window x:Class ="WpfDemo.MainWindow" xmlns ="http://schemas.microsoft.com/winfx/2006/xaml/presentation" xmlns:x ="http://schemas.microsoft.com/winfx/2006/xaml" Title ="依赖属性" Height ="237" Width ="525" FontSize ="18" WindowStartupLocation ="CenterScreen" > <Grid > <StackPanel > <TextBlock > 我使用的是继承的fontsize</TextBlock > <TextBlock FontSize ="11" > 我使用的是自己的fontsize</TextBlock > </StackPanel > </Grid > </Window >
界面运行效果:
2.3 节省内存空间 依赖属性和CLR属性在内存的使用上是截然不同的,每个CLR属性都包含一个非static的字段。
而wpf允许对象在创建的时候并不包含用于存储数据的空间,只保留在需要用到数据的时候能够获得该默认值,即用其他对象数据或者实时分配空间的能力。
3. 如何自定义依赖属性 3.1 声明依赖属性变量 依赖属性的声明都是通过public static来公开一个静态变量,变量的类型必须是DependencyProperty
3.2 在属性系统中进行注册 使用DependencyProperty.Register方法来注册依赖属性,或者是使用DependencyProperty.RegisterReadOnly方法来注册
3.3 使用.NET属性包装依赖属性 在类上实现属性时,只要该类派生自 DependencyObject,便可以选择使用 DependencyProperty 标识符来标示属性,从而将其设置为依赖属性。
其语法如下:
1
2
3
4
5
6
7
8
9
10
11
12
public static DependencyProperty TextProperty;"Text" , typeof (string ), typeof (TestDependencyPropertyWindow), new PropertyMetadata("" )); public string Textget { return (string )GetValue(TextProperty); }set { SetValue(TextProperty, value ); }
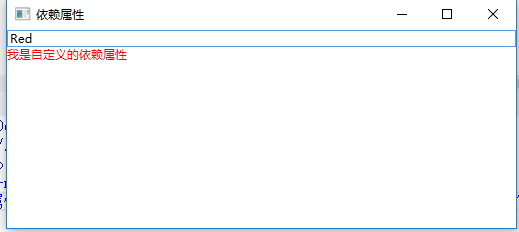
示例:自定义一个依赖属性,界面包括一个TextBox和TextBlock,TextBlock上面字体的前景色随TextBox里面输入的颜色而改变,如果TextBox里面输入的值可以转换成颜色,TextBlock字体的前景色会显示输入的颜色值,如果不能转换,显示默认的前景色。
1、在当前项目里面添加一个WPF版的用户控件,命名为“MyDependencyProperty”,在MyDependencyProperty.xaml.cs文件里面自定义一个依赖属性:
1
2
3
4
5
6
7
8
9
10
11
12
13
14
15
16
17
18
19
20
21
22
23
24
25
26
27
28
29
30
31
32
33
34
35
36
37
38
39
40
41
42
43
44
45
46
47
48
49
50
51
52
53
54
55
56
57
58
59
60
61
62
63
64
65
66
using System;using System.Collections.Generic;using System.Linq;using System.Text;using System.Threading.Tasks;using System.Windows;using System.Windows.Controls;using System.Windows.Data;using System.Windows.Documents;using System.Windows.Input;using System.Windows.Media;using System.Windows.Media.Imaging;using System.Windows.Navigation;using System.Windows.Shapes;namespace WpfDemo public partial class MyDependencyProperty : UserControl public MyDependencyProperty (public static readonly DependencyProperty MyColorProperty;static MyDependencyProperty ("MyColor" , typeof (string ), typeof (MyDependencyProperty),new PropertyMetadata("Red" , (s, e) => var mdp = s as MyDependencyProperty;if (mdp != null )try var color = (Color)ColorConverter.ConvertFromString(e.NewValue.ToString());new SolidColorBrush(color);new SolidColorBrush(Colors.Black);public string MyColor get return (string )GetValue(MyColorProperty);set value );
快速定义依赖属性的快捷方式:
输入propdp,连续按两下Tab健,自动生成定义依赖属性的语法。
和输入cw连续按两下Tab健,自动生成Console.Write()一样。
1
2
3
4
5
6
7
8
9
public int MyPropertyget { return (int )GetValue(MyPropertyProperty); }set { SetValue(MyPropertyProperty, value ); }public static readonly DependencyProperty MyPropertyProperty ="MyProperty" , typeof (int ), typeof (ownerclass), new PropertyMetadata(0 ));
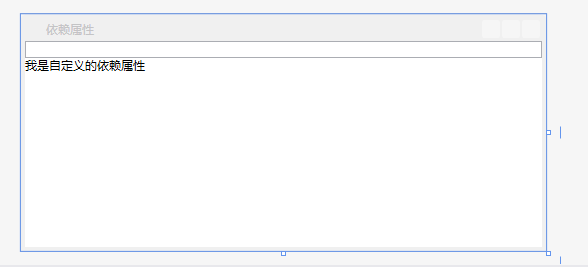
2、在MyDependencyProperty.xaml里面添加一个TextBlock
1 2 3 4 5 6 7 8 9 10 11 <UserControl x:Class ="WpfDemo.MyDependencyProperty" xmlns ="http://schemas.microsoft.com/winfx/2006/xaml/presentation" xmlns:x ="http://schemas.microsoft.com/winfx/2006/xaml" xmlns:mc ="http://schemas.openxmlformats.org/markup-compatibility/2006" xmlns:d ="http://schemas.microsoft.com/expression/blend/2008" mc:Ignorable ="d" d:DesignHeight ="300" d:DesignWidth ="300" > <Grid > <TextBlock > 我是自定义的依赖属性</TextBlock > </Grid > </UserControl >
3、在MainWindow.xaml里面引用新创建的用户控件,并添加一个TextBox,用于输入颜色值,并将自定义的依赖属性MyColor绑定到TextBox
1 2 3 4 5 6 7 8 9 10 11 12 <Window x:Class ="WpfDemo.MainWindow" xmlns="http://schemas.microsoft.com/winfx/2006/xaml/presentation" xmlns:x="http://schemas.microsoft.com/winfx/2006/xaml" xmlns:p="clr-namespace:WpfDemo" Title="依赖属性" Height="237" Width="525" WindowStartupLocation="CenterScreen"> <Grid > <StackPanel > <TextBox Name ="tbColor" > </TextBox > <p:MyDependencyProperty MyColor =" {Binding Path=Text,ElementName=tbColor} " ></p:MyDependencyProperty > </StackPanel > </Grid > </Window >
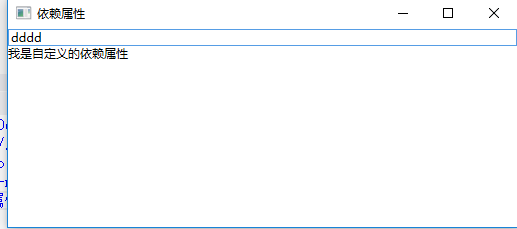
在设计界面显示的效果:
4、程序运行效果:
在TextBox里面输入正确的颜色值,前景色会显示为当前输入的颜色:
在TextBox里面输入错误的颜色值,前景色会显示为默认颜色: